Color Management without the Jargon video: now available!

[Note: I now have a newer video, Color Management for Photographers and Designers (2014), that updates what I covered in Color Management without the Jargon (2009). Color Management for Photographers and Designers includes more current information about color-managing Photoshop, Lightroom, and Adobe Creative Suite applications as well as demonstrations of profiling a display, a printer, and a camera.]

Are you a photographer or designer and still not quite sure how color management works? Confused about how to use color profiles? Have you tried to read books and articles about color management, but are overwhelmed by the terminology?

Color Management without the Jargon cover

Now you can better understand color management with my DVD and online video, Color Management without the Jargon: A Simple Approach for Designers and Photographers Using the Adobe Creative Suite. I created this video as an approachable introduction to the ideas behind color management and the basics of a good color management workflow. While there’s a lot of good material about color management out there, I feel that much of it jumps into jargon and abstract concepts too quickly. I saw an opportunity to explain color management in the simplest possible terms. I intend Color Management without the Jargon to prepare you for and to complement the deeper, more comprehensive, but also far more challenging material out there.

What you’ll learn

This 1½ hour training video helps beginning and intermediate Photoshop, Bridge, InDesign, and Illustrator users understand the basics of color management, including how to profile monitors and create consistent color in a production workflow. This video provides technical background without being overwhelming, and presents concepts and steps that are easy to follow.

How to watch

You can order Color Management without the Jargon as a DVD from your favorite bookseller or store, or you can watch it online as a streaming video from Peachpit Video. Here are some links to get you started:
DVD on Amazon.com
DVD on Peachpit.com
Watch online at Peachpit.com

More info

Below is the publisher’s marketing copy if you want to learn a bit more…

Every digital photographer or graphic designer knows that color management is important, but many still do not calibrate their computer monitors or understand how color works in different spaces. This 90-minute DVD will help beginning and intermediate Photoshop, Bridge, InDesign, and Illustrator users understand the basics of color management and how to create consistent color in their workflow.

Highlights of this accessible and easy-to-follow DVD video include:

  • Calibrating your monitor and digital SLR camera
  • Tackling color profile detective work in Photoshop and InDesign
  • Assigning, converting, and embedding profiles
  • Managing color output for print and the Web
  • Integrating raw files and Lightroom into your workflow
  • Handling color conversions between video-editing software and Photoshop

The supporting 48-page printed reference guide provides additional links and content.

Canon 7D: Optimizing DSLR video dynamic range

There’s a great tutorial over at Vimeo on controlling the dynamic range of digital SLRs when capturing video. It turns out that the video mode of digital SLRs is tuned like a typical JPEG mode: To get a contrasty, “finished” look right away. But like JPEGs, this means a lot of tonal and color information is tossed out before the capture is saved, which can be limiting if you need a look that’s different than what the camera gives you. If highlights are blown or shadows are plugged, you may be left with nothing to work with at the high or low end when you try to adjust the image quality.

The technique covered in the video linked below involves using Canon Picture Styles (presets for how the camera processes images) to dial down the contrast and color in an attempt to squeeze as many of the original scene’s tones as possible into the range the sensor can capture. A file captured this way looks flat and lacks contrast, and isn’t something you would show as finished. But that’s because, as with raw capture or like Ansel Adams shooting film, we are at a step in the process where we’re not trying to create a perfect picture at the moment of capture, we’re trying to capture enough of the right data from which we can produce a perfect picture in post-processing. That’s an important difference.

It’s also important to understand that this capture technique isn’t quite as good as actually capturing video in raw format, but video cameras that do are pretty rare and I think most of them are expensive and called RED. This technique is about doing the best you can with the non-raw capture you have.

This capture technique is often called increasing or maximizing the dynamic range, but I prefer to call it optimizing. You’re not making the sensor capture more tones, you’re rearranging the tones you’ve captured before they’re recorded. I suppose you could call it maximizing the available dynamic range.

Here’s the URL to the video:
http://vimeo.com/7256322

While the video talks about the technique in terms of the Canon 7D, Canon Picture Styles can be used with the 5DMkII and others. And the principle can be applied to other brands of cameras that give you control over the image quality of the video.

(Update: [May 2011] You might want to try the new Cinestyle picture style by Technicolor and Canon, a more “official” version of the picture styles described in this post.)

List of Canon SLR error codes

The Tallyn’s blog has posted a list of error codes you might see in Canon digital SLRs:
Canon Error Codes Revealed

What, no Error 99? (Actually, the post says the list is for the 5DMkII and later models.)

Mac OS X: The Dock or Application Switcher stops working

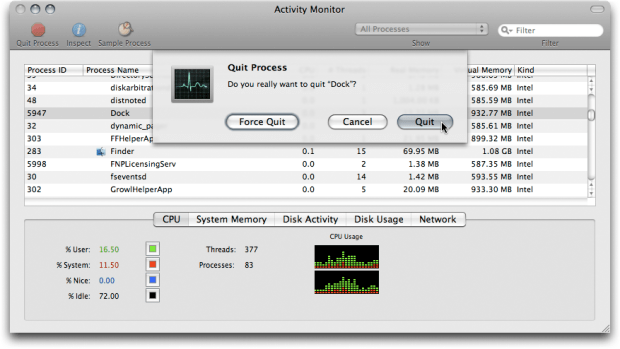
Today I tried to press the Command-Tab shortcut for the Application Switcher but nothing happened. Another thing that wasn’t working was moving the mouse to the edge of the display to make the hidden Dock appear. The keyboard shortcut to display the Dock wasn’t working either. If this happens to you, the way to fix all of these problems is to restart the Dock. Open the Activity Monitor (it’s in the Utilities folder), select Dock in the list, and click the Quit Process button (or choose View > Quit Process). In the confirmation dialog box that appears, click Quit. The Dock is one of those processes that restarts itself if it’s quit, so that’s all you should have to do. The Dock and Application Switcher should both work now.

Quitting the Dock

Not everyone is aware that the Dock hosts many processes in Mac OS X. For example, in addition to running the Application Switcher, the Dock also runs all of the Dashboard widgets. That’s why the way to make all Dashboard widgets quit is to quit the Dock. (When you simply exit Dashboard, its widgets don’t actually quit—they keep running invisibly in the background, taking up RAM and CPU power.) You can see how processes run within each other in Activity Monitor if you click the Show pop-up menu at the top of the window and choose All Processes, Hierarchically.

Now, of course, you can also fix this by logging out and back in, or you can restart the entire computer. But I often work with a lot of programs and documents open, and that’s why I look for ways to fix problems without having to close all my programs and windows and then set up the entire workspace again.

Adobe Bridge: Workspace not saved on Mac OS X

You want to save a workspace in Adobe Bridge in Mac OS X, but it won’t “take.” The next time you start Bridge, the workspace isn’t available or doesn’t apply when you select it. It just does nothing.

The fix is to open Apple Disk Utility, select your startup volume, and click Repair Disk Permissions.

Now, I know that in theory, repairing permissions shouldn’t fix it. You can count me among those who think that repairing permissions is generally voodoo and that you really oughta be going down other roads first, to fix a problem. But for this particular problem, repairing permissions has worked every time. One time a person walked up to me after one of my conference talks and asked this question and brought the laptop on which it was happening. We tried deleting Bridge preferences and all the other usual troubleshooting techniques, but saved workspaces simply didn’t work until I repaired permissions. It doesn’t make sense, but hey, don’t knock it if it works, right?

I know this is true for Adobe Bridge CS4 on Mac OS X 10.5. I’m not sure if the problem exists or if the solution works on other versions of either software.