Photography concepts

How to Blur Backgrounds with a Compact Camera — CreativePro.com article

Blurring the background of a photo is often used to help draw attention to the subject. It’s not hard to do with an SLR camera because of the size of the digital sensor or film frame, but what if all you have is the little digital camera in your pocket? You can still get it done using traditional techniques for depth-of-field control, but with a small camera you’ll have to work a little harder at it. The good news? Some newer digital compact cameras give you more of the depth-of-field control that used to be available only with larger cameras.

Want the whole story? Click the link below to read my article at CreativePro.com:
How to Blur Backgrounds with a Compact Camera

How to Blur Backgrounds with a Compact Camera on CreativePro.com

Stage lighting: Revealing hidden details with white balance

…or, This is Totally Why I Shoot Raw

Concerts and other stage performances are often lit by colored gels or LEDs that change quickly. Even auto white balance won’t know what to do as the lighting pattern changes and goes to extremes, such as deep blue or red. Faces can appear as as one solid color with no detail, as in the first picture below.

Fortunately, raw format brings us a nice surprise here. I shot the following raw image during the American tour of the French retro-synthpop band Yelle, and at first glance it looks like the faces are nothing but blue blobs. Happily, it turns out that shifting the white balance value in a raw processor (I used Adobe Photoshop Lightroom 3) reveals dramatically more detail; it’s like a completely different picture.

Raw, white balance As Shot

Raw format, white balance As Shot: Faces are blank

Raw, white balance adjusted

Raw format, white balance adjusted…and details are magically revealed

What I think is going on is that they were in the blue light’s shadow but the warmer red light was at a better angle for their faces. Warming up the white balance de-emphasized blue and dug more red out of the raw file, so that the red light became the primary light source. If I’m right, it means this trick works only if at least one of the differently colored light sources is at an angle that’s favorable to the subject.

This technique doesn’t work at all with the JPEG version of the image shown below, because the RGB color values are already baked into the file. You can no longer get more red, you can only lose blue, so shifting the white balance of the JPEG image doesn’t reveal any useful new details.

JPEG exported from raw with As Shot white balance, and then adjusted

JPEG version also starting from As Shot white balance: Adjusting WB doesn't help

In a situation where white balance holds steady or changes slowly, you might be able to achieve the same quality in JPEG format by doing a custom white balance in camera. However, in an environment like a concert or even a wedding where the light and the action change so quickly, there’s simply no time to rebalance, so shooting raw is the only way to get the most out of your images later.

You might notice that for the JPEG format image, the WB scale is centered at zero and adjusted positive and negative to that. It’s a relative adjustment instead of the absolute color temperature value that’s available in raw, because for a JPEG image, the original white balance is now baked permanently into the image, providing less flexibility when editing. That’s a big reason I shoot in raw format. I even prefer pocket cameras that record in raw format (like the Panasonic DMC-LX3 I used to take this photo), so that I can rescue images like this one when needed.

What if you’re shooting with a camera that records only in JPEG format, or with a video camera? You’re stuck with what the camera gives you. The best white balance setting will depend on the white balance of the stage lights before colored gels are put on them. Older incandescent lights may be closer to tungsten white balance, while some LED lights may be balanced closer to daylight. You’ll have to try some test shots using the daylight or tungsten white balance presets, and see which setting produces more appealing images. Or, if you’re able to light up a white surface with pure white stage lights, you can try setting a custom white balance off of that.

Discover better photos by getting high (or low)

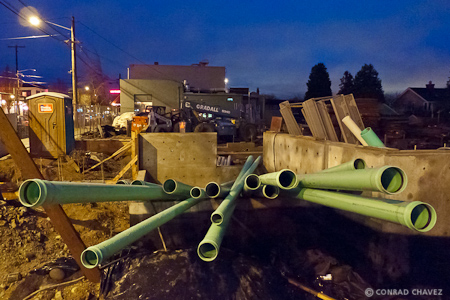
It’s easy to fall into the trap of seeing a subject, shooting at eye level, and simply moving on; I have to remember to break out of that habit all the time. Walking past a building site the other night, I was intrigued by the color and perspective of the green pipes they brought in. The way the pipes leaned out over the new walls looked like a battleship gun Terry Gilliam would dream up. The eye-level shot I took really didn’t do anything for me and I deleted it, but I really wanted to make the shot work. I remembered to try pushing the pipes up into the sky or down into the ground simply by moving the camera up and down. As a result, I got two shots I liked a whole lot more than the eye-level shot.

Fire Station 21 pipes looking up

Fire station pipes looking down

For the first shot I lowered the camera to about a foot off the ground, and for the second shot I raised the camera as far up as my arms could reach. That simple 6-foot difference produced two noticeably different images.

What the photos don’t show is the chain-link fence around the building site. To make the fence disappear, I moved the camera right up to the fence and shot through it. The fence turned out to be more of a help than a hindrance, because I was able to brace the camera on the fence with both hands to steady a long exposure enough for the camera’s image stabilization to be able to make up the difference. This was made easier because I was shooting with my pocket camera, a Panasonic DMC-LX3 set to shoot raw at ISO 1600. If it had been an SLR, I wouldn’t have been able to rest the entire lens inside one of the chain link holes.

It was the screen on the back of the camera that let me compose the shots without having to lie on the wet ground or finding a ladder. There’s a rather significant group of photographers that’s devoted to the optical viewfinder, and they tend to take a dim view of shooting with any electronic viewfinder. These two shots are examples of why I don’t agree with them. On the camera screen I was able to compose and check the composition at the edges, level (with the help of the on-screen grid option), and check exposure with the help of the histogram and clipping display, and I could do it with the camera at an odd angle far from my face. Being able to read the screen from a distance freed me up to create two very different compositions from the same spot on the sidewalk.

When processing the shot later in Lightroom 3.3, noise reduction, Clarity, and Vibrance were very helpful in cleaning up the image and punching up the color and local contrast. High ISO shadows can be a little purple on this camera, so I reduced the purple saturation in the Hue/Saturation/Lightness panel.